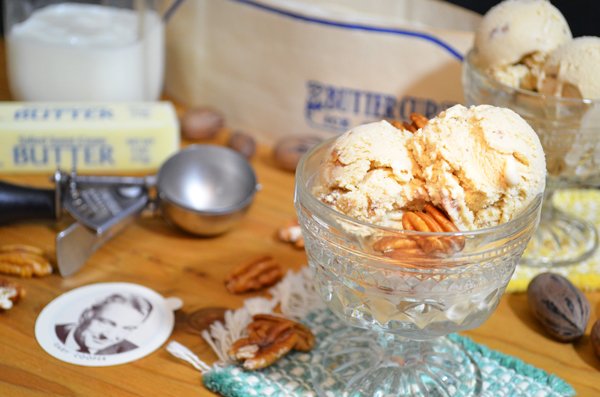
Follow step-by-step, photo illustrated instructions for making this creamy and crunchy Butter Pecan Ice Cream. We’re toasting our pecans, making our custard from scratch, then freezing it in our wooden ice cream churn. We’ll take it up a notch by using Maple Syrup and North Carolina grown Pecans. The whole family is going to love you for making this one. Printable recipe included.

Butter Pecan Ice Cream Recipe:
THIS… is really, really GOOD. Butter Pecan has always been my favorite flavor of ice cream, long surpassing either Vanilla or Chocolate. Fudge Royal would come in second, with Nutty Coconut falling in at third. But, Butter Pecan is my favorite. Did I tell you that?
I’ve been wanting to make this for you for over a year now. With a few small changes, it’s an adaptation of a recipe from the friend of a friend.
Wanting to make some homemade ice cream last year, I emailed my friend and asked her what her favorite flavor was, and if she had a recipe for it. She said she didn’t have any recipes, but felt pretty sure another friend of hers did. A few weeks later, I received an Email with several recipes for ice cream attached, one of which was for Butter Pecan.
The original recipe called for Maple flavored pancake syrup. I’ve opted to use real Maple Syrup instead, and I changed the eggs and cooking method for the custard. I hope my friends will approve, and I hope you will like the changes should you decide to make this yourself. I really don’t think you’ll be disappointed. Did I happen to mention that it was really good?
I shared some of my ice cream making memories last year when I made this recipe for Peach Preserve Ice Cream. You can click the link for more on that one, and read some of my recollections of cranking the handle on a Sunday afternoon at church when I was much younger.
Isn’t it great that Ice Cream isn’t just for the summer? We enjoy it all year long now, and with fresh local fruit and berries coming in, we can have a good variety of flavors to select from. Peach, Strawberry, Blueberry anyone? I thought so.
I’ve got a couple more ice cream memories below, but if you’re ready, let’s get out the ice cream maker and… Let’s Get Cooking!

Do you remember these?
I picked up this paper “hat” at a local auction I attend. For years, these hats were worn by car hops and soda fountain employees to protect your food and to promote their business. This one was even more special in that I well remember enjoying Buttercup Ice Cream as a youngster.
The smaller discs were the lids for a small, round, cardboard container that contained ice cream. Manufactured by Dixie Ice Cream, and other brands, they included pictures of movie stars, sports figures, animals, and even military equipment over the years they were used.
A small piece of wax paper covered the photo as you licked the inside of the lid clean. Then, you’d carefully peel away the wax paper to reveal the photo. This is one that had movie star Gary Cooper on it. The lids were produced from 1933-1954. Some were even in 3D and full color… way back then. You can read more about them here: Famous Faces Under The Lids.
Ice cream was a special treat back then. You’d get a wooden spoon with your cup of ice cream so you could enjoy it on the spot. Good memories!

Homemade Butter Pecan Ice Cream: You’ll need these ingredients.

Place your Pecans in a medium sized mixing bowl. I’m using whole pecans from the NC State Farmers Market so I know they are locally grown.

You’ll need Pecan pieces for this recipe. Chop them up as desired.

Add the melted Butter.

Add the Granulated Sugar.

Add the Salt.

Stir everything up really good, making sure all the pieces are coated with Butter and Sugar.

Realize that you don’t have any Parchment Paper, and substitute by placing aluminum foil on a baking sheet. Parchment paper would be best if you have it on hand. Either way, spread the coated Pecans out across the pan in a single layer.

Place the Pecans in a pre-heated 350ºF oven. Let them bake for 10-12 minutes until lightly toasted. Remove them from the oven when done, set aside, and let completely cool.

Separate the Egg yolks. I really do have six in that bowl. I’m using local eggs from a friend of mine and it seems they have tougher shells but thinner coverings over the yolks. I always seem to break one or two. That’s why we always suggest that you break them one at a time over a separate bowl so you don’t end up with any more Egg white in the yolks than you can help.

Whisk the yolks until creamy.

Add the packed cup of Brown Sugar. Remember to pack the sugar down into the cup until it’s good and full. I’m using Dark Brown Sugar here, but Light Brown will work as well.

Add the Granulated Sugar.

Add level Tablespoons of Corn Starch. This will act as a thickener for the custard, and it also helps to prevent the eggs from curdling. Did you know that already?

Whisk everything together really good.

Add the Maple Syrup. You can save a few dollars by substituting Maple Flavored Pancake Syrup if you like, or if you just prefer the taste of it better. You really should try this with some good Maple Syrup though.

Whisk again, real good, until everything is fully combined. Set the mixture aside for the moment.

Add the milk into a large sauce pot.

You’ll also want to setup a thermometer so you can bring the milk up to the proper temperature.

Stir, stir, and keep stirring, all the way to the bottom, as the Milk is brought up to 170°F. It’s really easy to have some milk sticking to the bottom of the pot. Just keep stirring and watching the thermometer until it reaches the proper temperature.

Let’s TEMPER the Eggs. When the milk reaches 170°F, remove it from the stove top. We’re going to use the hot milk to “temper” the eggs. If you just poured all the hot milk into the eggs at one time, they would probably turn into scrambled eggs, something we don’t want to happen.
Begin by adding just a small amount of the hot milk at a time, into the egg mixture. Whisk it quickly and constantly the entire time. Gradually continue to add the milk until you’ve got it all added into the egg mixture. Once you’ve got about half of the milk mixed in, you’re pretty safe to go ahead and add the remainder. Just keep whisking it together as you go.

Keep whisking until all the milk has been added to the egg mixture.

Pour the Milk and Egg mixture back into your cleaned sauce pot. Be sure to wash out any old milk that might have dried around the inside edge of the pot, or stuck to the bottom.

Place the sauce pot back on your stove top. Insert the thermometer again, and bring this mixture back up to 170°F. Again, you’ll have to continually stir the pot so it doesn’t stick to the bottom or burn.

When it reaches 170 degrees, the mixture should have thickened. You can tell if it’s ready by dragging your finger across the back of the spoon you’ve been stirring with. If it leaves a trail, as pictured above, your custard is ready. If not, continue to stir and cook until it thickens up.

When the mixture has properly thickened, remove the pot from the stove top and place it in your sink. You could sit it on a folded dishcloth if needed. Close up the sinks drain, and start adding cold water into the sink.

Continue to stir the mixture as you let the cold water come up around the outside of the pot. Make sure no water gets into the mixture and only bring the water level up to about half way of the pot. If you add too much water, the pot might start to float away and could tip over.

Resist the urge to scrape the sides of the pot. You might see some of the custard clinging to the inside walls of the pot as you proceed. If you stir this in, it might cause some lumps in your finished product. Just let it stay right where it’s at.

When the mixture has cooled sufficiently, pour it into another container so you can refrigerate it. You could place a sheet of plastic wrap over the top of the custard, letting it actually touch the custard, so a “skin” doesn’t form on it while it’s under refrigeration. Either way, cover the cooled custard and refrigerate overnight if possible. The mixture needs to be good and cold before you continue with the recipe.

Let’s Make Ice Cream: When you’re ready to make the Ice Cream, remove the toasted pecans from the pan. These sort of ran together as they were in the oven. Don’t ask me what happened to the pecans on the right hand side of this tray. I ain’t telling. (Smile)

You’ll need to crumble these back up, or maybe just toss them back into a small bowl and chop them a little more.

Add the toasted Pecans into the custard.

Add the Vanilla Extract.

Add the Whipping Cream.

Realize that you really should be using a larger bowl, but stir the mixture fully to combine. To be honest, I removed a bit of the custard before I added the Pecans and the cream. I placed it in the can of my ice cream freezer. I still ended up with a full bowl, but I stirred it carefully and didn’t spill but just a little.

Add the mixture to the can of your ice cream maker.

You’ll need to process the custard to the manufacturers directions for your particular machine. I like my old wooden bucket ice cream maker, but I really like the fact that it’s “electric.” You didn’t really think I’d be cranking this by hand did you? I love the old ways, and I did that as a child, but I’m willing to just keep those as memories while the electric motor does it’s thing.

You’ll end up with a soft ice cream when it’s properly churned. Want a taste? If I must say so myself, this stuff was GOOD!

Ripen and harden the mixture according to your machine. The finished Ice Cream can then be packed into storage containers and frozen for later if need be. Did I mention that this stuff was really, really good?

Enjoy!